REPORT
Guide for applicants who are unable to access Bluebeam
Guide for applicants unable to access Bluebeam
Applicants who do not have access to Bluebeam software but wish to receive review comments via a PDF file must request their submitted PDF files be returned digitally with comments. Applicants can then respond to comments in Adobe Acrobat and resubmit the original reviewed set along with a revised submittal set.
1.0 Receive a link to access the Applicant’s reviewed files
1.1 Applicant will receive an email from the CCSF Support Staff indicating the files have been sent to the applicant. The email should contain 3 items:
- Exhibit K1 (this exhibit), containing instructions to download and respond to reviewer comments without using Bluebeam.
- The CCSF Bluebeam Session Studio ID Number. This number will be needed for Applicant resubmittal & tracking at resubmission.
- The location for Applicant resubmission. Applicants will be asked to resubmit using either the sf.gov website or the SF SecureShare website.
1.2 Applicant will receive a second email with the subject line “You’ve been added to a workspace”
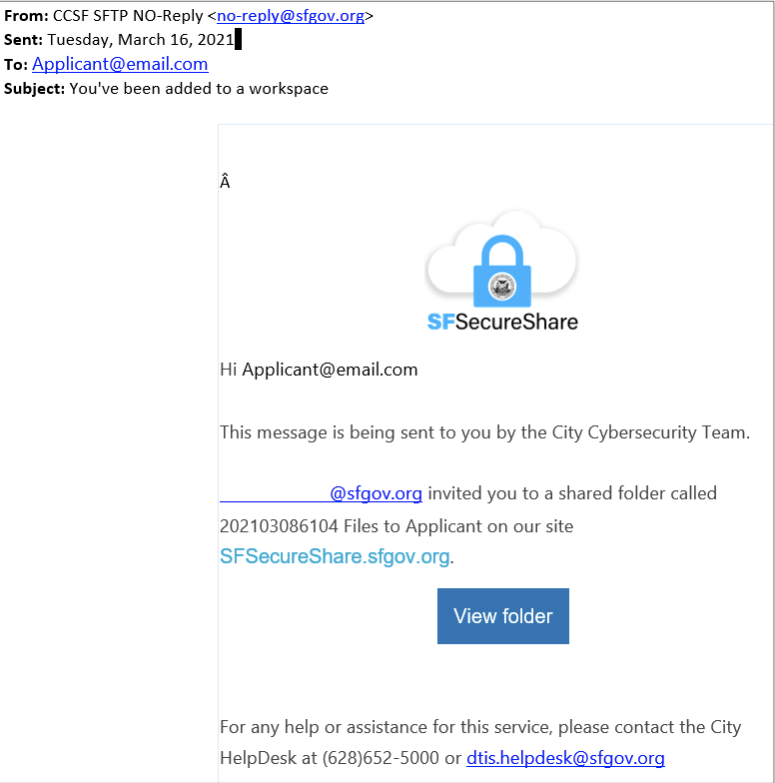
1.3 Click “View Folder”. SF SecureShare will require registration with a username and password to access the shared folder. If the user already has an account, there is a login option at the bottom.
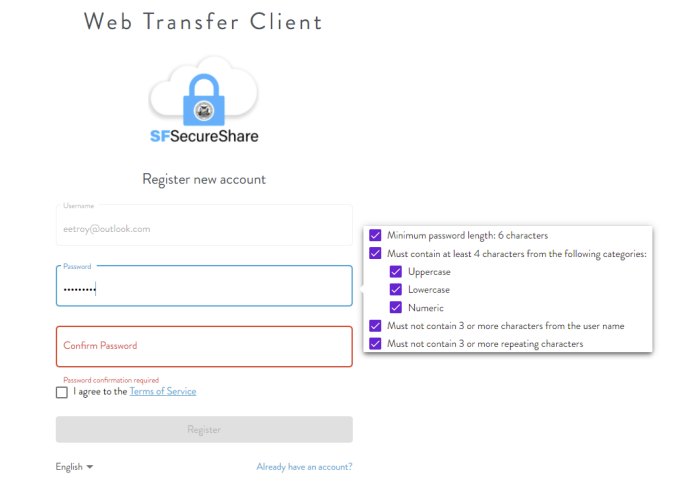
Note: Once the Applicant registers with a username and password, there is an email verification step. Once the email is verified, the Applicant will have access to the folder created and shared by the Reviewer.
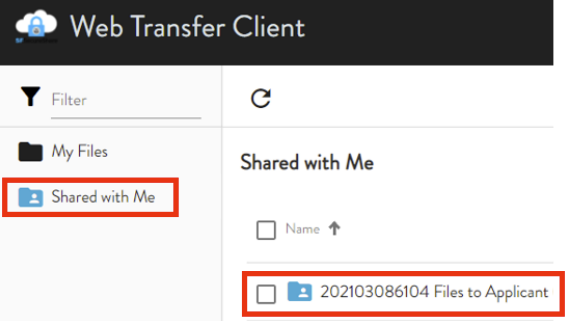
1.4 Locate the folder titled “Shared with Me” on the left. The shared folder and files will be in that folder.
2.0 Download the reviewed files from SF SecureShare
2.1 In the shared folder, locate and select (using the checkbox) the files to download.
2.2 Click the download button to download to a local drive.
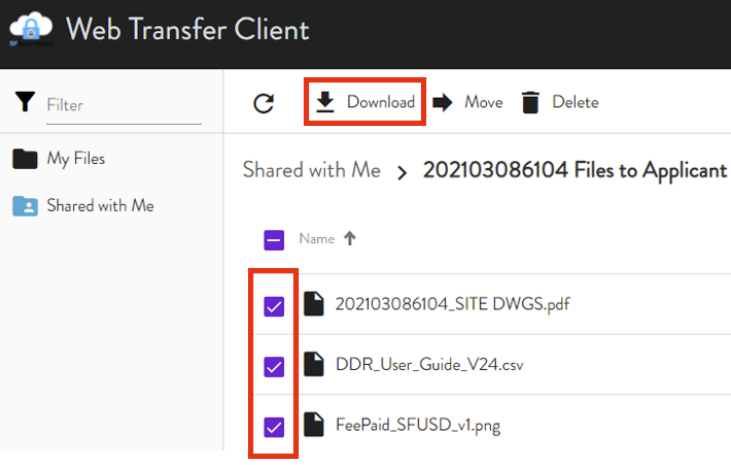
Note: Allow the browser to download multiple files.
2.3 Once the files are downloaded, they are ready to be opened and reviewed by the Applicant using Adobe Acrobat Reader or another PDF application.
3.0 Open and view PDF markup comments in Adobe Acrobat Reader
Note: Adobe Reader is a free program available for both MAC and PC, and can be downloaded by searching “Adobe Acrobat Reader Download”
3.1 Open document in Adobe Reader
3.2 From the Tools menu, click Comment to activate the Comments Menu.
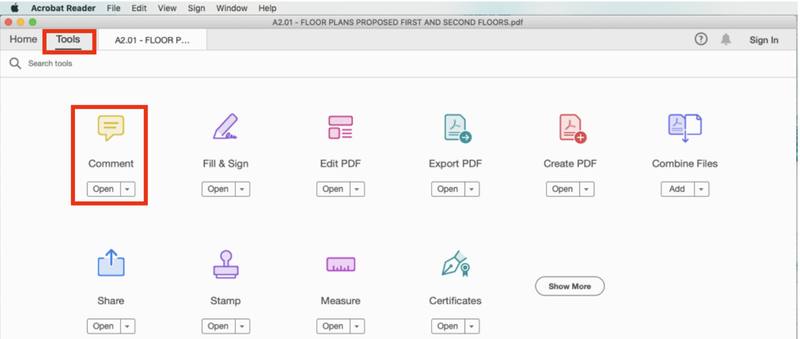
Note: comments will appear on the screen. See Comments on the right side in the next screenshot below.
3.3 Next, click the left-side tab to open the thumbnails.

3.4 Once Thumbnails and Comments tabs are open, review the comments from the CCSF Reviewers. Review comments both on the drawing and in the Comments tab.
4.0 Respond and reply to markup comments
Note: There are two ways to respond to reviewer comments: using the status menu or replying directly to comments.
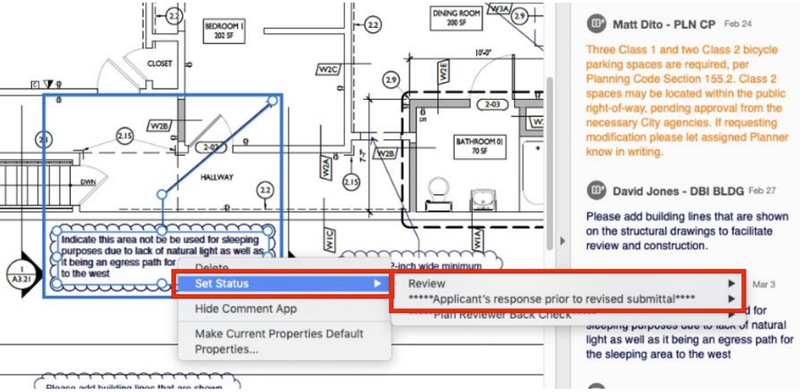
4.1 Respond to comments using the Status menu
- Right-click on the comment on the page
- Select “Set Status” and choose a response from the Applicants response menu
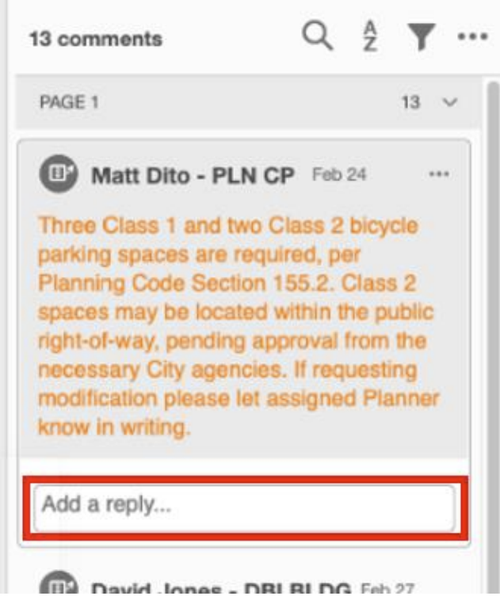
4.2 Respond to comments using the Reply function
- Click the comment in the Comments Tab
- In the “Add a reply…” box under the comment, add a response to indicate to the CCSF reviewer the reconciliation response action
5.0 Create subsequent submittal set
5.1 Once all the comments have been reviewed, create the revised documents.
5.2 Be sure to indicate in the original documents where the changes are in the revised set.
5.3 Refer to our formatting instructions and full CCSF Applicant Procedure for PDF formatting requirements.
6.0 Upload original set with applicant response and subsequent submittal set to SF SecureShare
Note: Contact SF Support Staff to determine which option to use to upload files. In both cases, the nine-digit Studio ID from the original Bluebeam Studio Session will be required.
6.1 Option 1: Upload files to SF.gov website
- From a web browser, open the site https://sf.gov/resubmit-plans-building-permit-application
- Click the “Submit Plans” button and follow the instructions for “Resubmission response to plan check comment”
6.2 Option 2: Upload file to SF SecureShare
- Return to the SF SecureShare site at https://sfsecureshare.sfgov.org/ or by using the original link sent from the CCSF Reviewer.
- Log in using the credentials created at registration.
- Click the folder titled “Shared with Me” on the left.
- Click to open the shared folder Click the Upload button and browse to locate/upload the “REV” revised documents.
- Also upload original files if Applicant responses have been made.
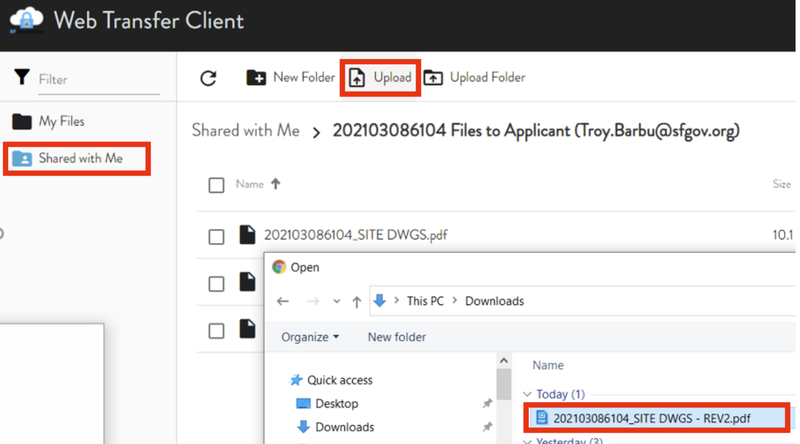
- Once the upload completes, the revised files will display in the shared folder.
7.0 Notify the CCSF Reviewer of the revised files
7.1 Email the CCSF Support Staff and let them know the name and location of the revised submission documents. Also include the Bluebeam Studio ID provided in the initial email (this helps track the documents).